You will need this printable pdf template of the bunny ear headband, paper, markers or crayons, glue, and as an option: tape or a stapler.
Print off the template on white paper. Have your kids colour their ears and cut them out. Glue the bottoms of the ears on a long strip of paper (the headband) about 50 cm/20 inches long. Adjust this around your child’s head and either tape, glue, or staple it at that spot.
Your child is now, officially, a bunny rabbit! Wasn’t that easy?!
Note: While I originally thought cardstock would make better ears, I’ve since discovered that plain paper works well. The curvature of the headband keeps the ears from flopping down. However, if you want more durable ears, cardstock is still a good option.
Make it a family activity: Bunny ears for everyone!
This activity promotes: fine motor skills, imagination, and creativity.

Cut out paper hearts and decorate the house! Fold a red piece of paper in half and draw half a heart over the fold. (See picture below) Cut out half heart, cutting through both halves. Unfold the paper and you have a heart.
 Make this a family activity: Make these hearts into valentines for your family. (Get everyone sharing them together.)
This activity promotes fine motor skills.
]]>
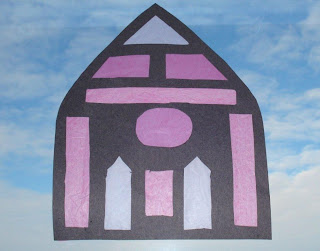
The sheet of construction paper will be the frame for your stained glass.
1) Draw different shaped windows/panes on the frame. Make sure you leave at least 1/4 inch (3 cm) of space between your windows so you will have room to glue your stained glass/tissue paper in behind.
2) Cut out the holes.
3) Cut out tissue paper pieces to fit behind the holes in the construction paper.
4) Gently glue the tissue paper (stained glass) in place.
Hang your stained glass in a window so light will shine through the tissue paper.
Make this a family activity: Create a large stained glass window by working together.
This activity promotes fine motor skills and creativity.
]]>
Fold your paper like an accordion. Start on one end of your paper and fold it up about and inch and a half. Then, flip you paper over and take your inch and a half fold and fold it (as well as the paper over it) up an inch and a half. Flip your paper over and fold the fold up again. Keep going until you are at the end of your paper.
Now, draw half a person on the top fold of your folded paper. Starting on the left fold, draw half a head–the middle of the head will be right at the fold. Draw the neck and body. The arms and legs come next and will reach all the way out to the right fold. Next, cut out your body–make sure you cut through all the folds–but do not cut the folds apart. You should have half a body when you are done.
Unfold. You should have a chain of people holding hands with their feet touching.
Make this a family activity: Have everyone make a chain that is ‘them’ and put all the chains together in a big family. You can buy a large frame at a second hand store to place your family chains into and hang them on the wall.
This activity promotes eye hand coordination as well as visualizing abstract concepts.
]]>You can make a placemat or coaster (sits under a cup so it doesn’t wreck the coffee table) on ordinary paper with crayons, paints, pens or pencil crayons. You can also stick stickers, glue pictures or other things to your placemat. If you laminate (sealed in plastic) your placemat at an office supply store, you can wipe it if you spill on it.

Hint: Try and keep your placemat thin. If it is too thick, you won’t be able to laminate it.
P.S. These can make a great gift.
Make this a family activity: Get the family together to make their own placemat or coaster. You can make them with a theme for special occasions like birthdays, Christmas, or simply because it’s the weekend!
This activity promotes creativity and fine motor skills.
]]>